Dumping and maintaining Casita gray and black waste water holding tanks isn’t the most glamorous topic we might discuss, but it certainly is an important topic for most who are new to Casita Life.
Some new to Casita Life decide to order their new Casita as a standard model, sans bathroom, to save on trailer weight, gain extra living and storage space, or because they don’t want to deal with dumping a black water tank. Others elect to order a deluxe model Casita with an onboard bathroom, that provides a marine-style toilet with black water waste holding tank. Having camped with and without an onboard marine toilet over 45 years, Dorrie and I long ago decided an on board toilet is essential equipment. And, its utility has increased as we have become senior campers.
Most RV hard shell campers and even some pop up campers today have marine-style toilets. Marine toilets aren’t like house toilets. Because there’s no toilet water tank, you need to do a two-step flush: Push the handle or pedal halfway down to fill the marine toilet bowl with water, then push it down all the way to flush into the black water holding tank.
Sunday, July 15, 2018
Sunday, July 1, 2018
Your Casita Tongue Weight Is Critical To Safe Travel
NHTSA data shows an estimated 50,000 trailer towing related accidents occur each year. Most of these accidents are a result of preventable side to side trailer sway. Crosswinds, drafts from passing semi-trucks or descending hills using incorrect braking technique can initiate trailer sway. In such cases, the rear of the trailer can act as a pendulum that increasingly swings back and forth. As the trailer makes this swaying movement, it can push the tow vehicle into fish-tailing movements. The intensity of the swaying movements can lead to trailer flipping over, which may, in turn, overturn your towing vehicle.
Uneven weight distribution -- too much weight loaded in the rear of the trailer -- is a significant cause of trailer side to side sway increasing to disaster, once it starts. Packing a few tens of pounds to the rear of the trailer can make profound changes in the rig's sway control stability. But properly balanced trailer weight can naturally dampen and stop trailer sway.
But by following a few simple guidelines, you can stay on track, towing with the utmost ease and safety. Swaying trailers are almost always the result of the center of gravity weight not being far enough foreword from the axle, which commonly referred to as insufficient tongue weight. Increasing tongue weight increases stability, but don't add too much weight to your tow vehicle's hitch.
Friday, June 1, 2018
Special Trailer Tires
Casitas with the factory “high rise” option are delivered with either Goodyear Endurance ST205/75R15 load range D tires, or Goodyear Endurance ST225/75R15 load range E tires, depending on supply chain availability. The ST stands for "special trailer" tire. There are differences in the driving requirements between the tires on your trailer and those on the car or light truck you use to tow it. Therefore, there are distinct differences between the way trailer tires and tow vehicle tires are engineered.
Your tow vehicle is a leader, which means traction is a key focus in the design of its tires. Typical passenger and light truck tires are developed with features like flexible sidewalls and long-lasting tread designs. This is because your tires accompany the steering and braking systems on your car and truck and transmit traction power from its drivetrain to the road. Traction allows your tow vehicle to accelerate down the road, turn around the corner and brake to a stop. Another important consideration is tow vehicle tires are designed for ride comfort, which is achieved in part by allowing their sidewalls to flex.
Your trailer is a follower, which often makes tire sidewall flexing a negative. Sidewall flexing on trailers, especially high center of gravity RVs that carry heavy loads, is a primary cause of trailer sway. Typical passenger tires with flexible sidewalls can accentuate trailer sway problems.
Trailers will be more stable and pull better on tires designed specifically for trailer use. Since Special Trailer (ST) tires are constructed with heavier duty materials, they are tougher than typical passenger vehicle tires.
Tuesday, May 15, 2018
What Size Tow Vehicle Do I Need?
One of the first questions asked by people contemplating the purchase of any RV camper trailer is: What size tow vehicle do I need?
How big and powerful a tow vehicle you need depends on the “fully packed for travel” weight of your Casita model of choice, and where you plan to travel with it. Travel only on level to moderate terrain roads verses frequent travel on winding mountain terrain roads, particularly with grades over 3-4 percent and high altitude passes, place different demands on tow vehicles.
First and foremost, for safety, it is important that your Casita trailer weight when fully loaded for travel does not exceed any of the maximum trailer towing ratings specified for your vehicle. A safe trailer load is around 80 percent of the tow vehicle’s maximum ratings.
Vehicle manufacturers specify trailer towing ratings based on a vehicle’s body strength, wheel base length, weight, engine horse power and torque, transmission and rear differential gearing, braking system, and suspension system. If your tow rig is within 20 percent of exceeding any of the vehicle’s maximum weight ratings, it may be difficult to handle at highway speed, stress your tow vehicle’s engine, transmission, brakes or other systems beyond their engineered limits, or lead to a catastrophic accident.
Depending on whether your Casita of choice is a lighter weight 16 foot standard model with no feature options, a 17 foot Deluxe model loaded with every available factory option, or something in between, your fully loaded Casita weight will most typically fall within a range of about 2,500 to 3,500 pounds. But that 1,000 pound difference can make a big difference in your choice of tow vehicles.
Tuesday, May 1, 2018
How to Lubricate Dexter EZ Lube Axle Bearings
The video below shows you how to lubricate the Dexter E-Z Lube® Axle Bearing System on your Casita.
The E-Z Lube® system consists of axle spindles that have been specially drilled and assembled with grease zerk fittings.
 No disassembly is required to repack bearings with fresh grease — just attach a grease gun at the spindle end zerk and inject the grease. When grease is pumped into the fittings, it is channeled to the inner bearing, then to the outer bearing, and eventually back out the grease cap hole for a complete bearing repack.
 No disassembly is required to repack bearings with fresh grease — just attach a grease gun at the spindle end zerk and inject the grease. When grease is pumped into the fittings, it is channeled to the inner bearing, then to the outer bearing, and eventually back out the grease cap hole for a complete bearing repack.
Tuesday, April 17, 2018
Building a Parking Pad and Driveway for My Casita
April 17, 2020
This time one year ago, in April 2019, our Casita became our temporary full time home while we moved our household from the Dallas, Texas, metro area to our new home in Colorado’s grand valley, where the Colorado and Gunnison rivers join on the western slope.

My first joint new home / Casita project in a month after we moved into our new house was to construct a fenced and gated concrete RV pad next to garage of our new house where our Casita could comfortably berth.
Unfortunately, local building codes did not allow me to replace the deep loose gravel RV drive with a concrete drive from the street up to my new concrete RV pad.


The loose gravel drive, that is on a slight incline, has been a problem every time I back the Casita from the street up onto its concrete pad.
The Casita tires and truck tires sink into the loose gravel up to the rims, and I have to back with the the truck locked into 4WD to force my rig through the considerable resistance of the deep loose gravel.
The gate area target I must back the Casta through has only about 12” of clearance on each side. Backing my rig up with my Casita and tow vehicle tires all plowing through the loose gravel drive incline, making a sharp turn on street pavement that transitions to the loose gravel drive, with the truck locked into 4WD, while navigating a blind 12” side to side clearance, with my gate target out of view in the rear mirrors, is a bit of challenge even for me.
By mid-March of a normal year, I’d be de-winterizing the Casita and getting it ready for camping season travel, but spring 2020, unfortunately, isn’t a normal year with so many camping areas around the U.S. indefinitely closed.
Since we are staying at home for a while, I decided to celebrate our first new home anniversary with another joint home / Casita project to fix my loose gravel RV drive problem.


I started a project to install a Standartpark durable plastic EasyPave gravel paving grid panel system on the gravel RV drive — see photo. This gravel paving system panels is engineered somewhat on the same principle as the steel panel paving system employed by Army engineers and Seabees (construction battalions) during World War II to rapidly build air station runways on soft terrain.
The photos at right show the RV drive just before I started my EasyPaver project, and the deeply rutted ground I found under the deep gravel. I shoveled the deep bed of loose gravel from the RV driveway into big gravel piles on the main driveway. This cleared the RV drive area of the gravel so I could build up a short retaining wall on one side. I then leveled the underlying dirt, filling in the deep tire ruts that had been hiding under the gravel.
I prepared an even ground base then shoveled most of the piles of gravel I had shoveled onto the main driveway back onto RV drive space to make an even gravel base of proper depth for the interconnecting EasyPave grid system panels. I used a gas engine compactor to compact the gravel base tight and flat.
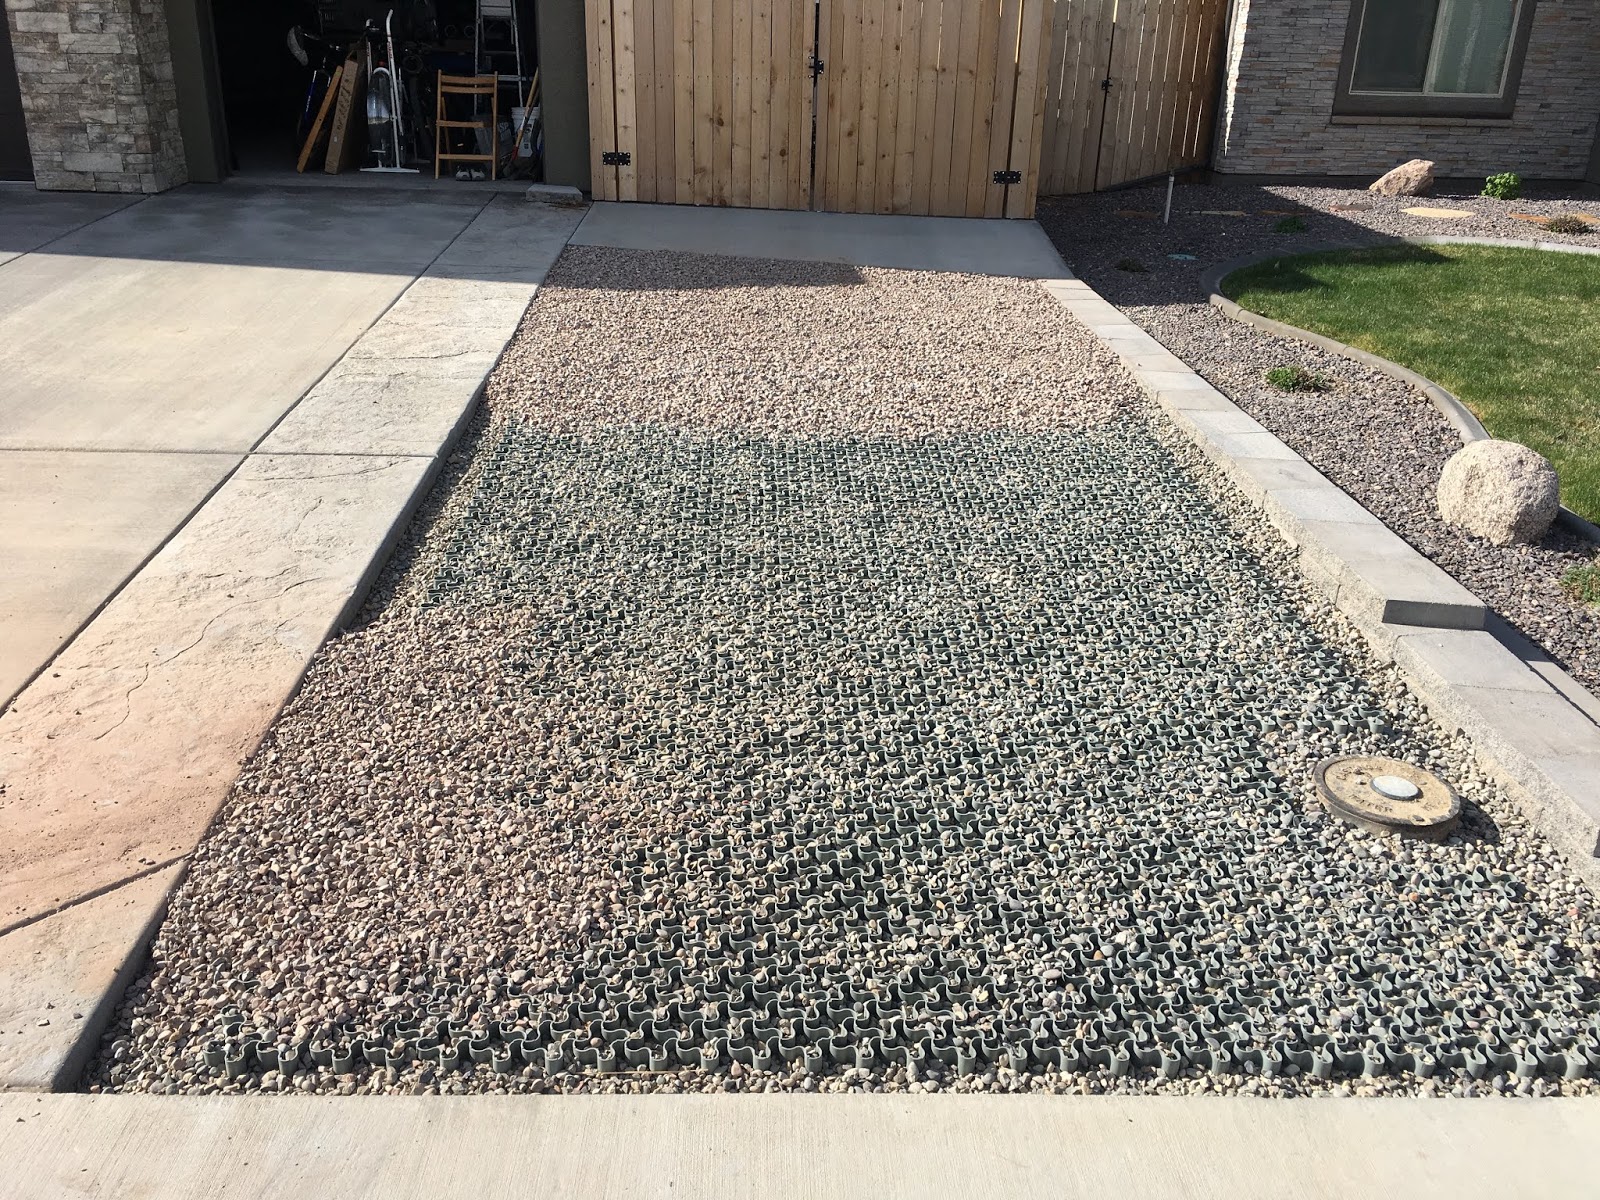
Next, I laid out and snapped together the EasyPave 16”X24” panels 7 across and 12 down in the RV driveway space, which is 123” across and 183” down. That left a 6” margin down each side and a 1” margin at the top and bottom of the driveway.
Once the grid panels were in place on the gravel base, I shovel the remaining gravel into the panel grid cells and top dressed the grid with a 1” (approximately) dressing of gravel. The gravel filled paving grid with a thin top dressing of gravel is not visible and provides a solid surface as good as a concrete drive.
The photos below show the compacted gravel base prepared for the EasyPave grid to be laid out.


Next, below, all the EasyPave grid panels are snapped together and starting to be filled with 3/4 gravel.


Finally, below, is the finished drive after the EasyPaver grid has been filled and top dressed with a 1” layer of 3/4 gravel.


This time one year ago, in April 2019, our Casita became our temporary full time home while we moved our household from the Dallas, Texas, metro area to our new home in Colorado’s grand valley, where the Colorado and Gunnison rivers join on the western slope.

My first joint new home / Casita project in a month after we moved into our new house was to construct a fenced and gated concrete RV pad next to garage of our new house where our Casita could comfortably berth.
Unfortunately, local building codes did not allow me to replace the deep loose gravel RV drive with a concrete drive from the street up to my new concrete RV pad.


The loose gravel drive, that is on a slight incline, has been a problem every time I back the Casita from the street up onto its concrete pad.
The Casita tires and truck tires sink into the loose gravel up to the rims, and I have to back with the the truck locked into 4WD to force my rig through the considerable resistance of the deep loose gravel.
The gate area target I must back the Casta through has only about 12” of clearance on each side. Backing my rig up with my Casita and tow vehicle tires all plowing through the loose gravel drive incline, making a sharp turn on street pavement that transitions to the loose gravel drive, with the truck locked into 4WD, while navigating a blind 12” side to side clearance, with my gate target out of view in the rear mirrors, is a bit of challenge even for me.
By mid-March of a normal year, I’d be de-winterizing the Casita and getting it ready for camping season travel, but spring 2020, unfortunately, isn’t a normal year with so many camping areas around the U.S. indefinitely closed.
Since we are staying at home for a while, I decided to celebrate our first new home anniversary with another joint home / Casita project to fix my loose gravel RV drive problem.


I started a project to install a Standartpark durable plastic EasyPave gravel paving grid panel system on the gravel RV drive — see photo. This gravel paving system panels is engineered somewhat on the same principle as the steel panel paving system employed by Army engineers and Seabees (construction battalions) during World War II to rapidly build air station runways on soft terrain.
The photos at right show the RV drive just before I started my EasyPaver project, and the deeply rutted ground I found under the deep gravel. I shoveled the deep bed of loose gravel from the RV driveway into big gravel piles on the main driveway. This cleared the RV drive area of the gravel so I could build up a short retaining wall on one side. I then leveled the underlying dirt, filling in the deep tire ruts that had been hiding under the gravel.
I prepared an even ground base then shoveled most of the piles of gravel I had shoveled onto the main driveway back onto RV drive space to make an even gravel base of proper depth for the interconnecting EasyPave grid system panels. I used a gas engine compactor to compact the gravel base tight and flat.
Next, I laid out and snapped together the EasyPave 16”X24” panels 7 across and 12 down in the RV driveway space, which is 123” across and 183” down. That left a 6” margin down each side and a 1” margin at the top and bottom of the driveway.
Once the grid panels were in place on the gravel base, I shovel the remaining gravel into the panel grid cells and top dressed the grid with a 1” (approximately) dressing of gravel. The gravel filled paving grid with a thin top dressing of gravel is not visible and provides a solid surface as good as a concrete drive.
The photos below show the compacted gravel base prepared for the EasyPave grid to be laid out.


Next, below, all the EasyPave grid panels are snapped together and starting to be filled with 3/4 gravel.


Finally, below, is the finished drive after the EasyPaver grid has been filled and top dressed with a 1” layer of 3/4 gravel.


Tuesday, January 30, 2018
Refrigerator Hinge Repair
The Dometic fridge in the 17′ Casita has a weak plastic hinge. It can break if it pops open in transit, is overloaded, or by leaning on it while open. Replacing the hinge required a costly new door from Dometic until Little House Customs came to the rescue with a stainless steel reinforcement plate that will help prevent the hinge from breaking. It will also fix a broken hinge. Click here to read full DIY refrigerator hinge reinforcement instructions.
Subscribe to:
Posts (Atom)
-
 As many have repeated the same experience before us, we arrived at our destination campground on the first day of our road trip, parked, con...
 -
 Whether you park your Casita in your driveway over the winter, or at a commercial storage facility, preventing your rig's pipes from fre...
 -
 Casitas with the factory “high rise” option are delivered with either Goodyear Endurance ST205/75R15 load range D tires, or Goodyear Enduran...