Back in the 1980’s, Dorrie and I were traveling and camping in our Dodge Maxi Van camper. We ordered the van - with a two barrel carburetor 318 engine - as a bare cargo van in 1976. I used my Dad’s carpenter shop to finish that bare van into our first comfortable camper vehicle.
Camping in that old Dodge van was fun, but by the mid-1980’s we were ready for a camper with stand up room, a kitchen, and a bathroom. Still, I loved the Dodge camper van I built and I wanted to continue to use it for our camping trips. So, we started to talk about upgrading to a small lightweight camper trailer that the our van could tow with its 318 engine.
I had some family camping experience with a pop-up tent camper trailer in the 1960’s. Pop-ups are OK, but after 10 years of travel with our van camper, we were in the mood for something a little more plush, with a bathroom, that I wouldn’t have to set up and take down at each camping stop. So that lightweight camper option was quickly dismissed. Few other seriously lightweight options available in the mid-1980’s were appealing to us.
Dorrie heard about an ultra lightweight fiberglass camper manufacturer called Casita that had recently started operations in Kerens, Texas in 1983. Kerens is less than a one hour drive south from our home just north of Dallas, so Dorrie called Casita and made an appointment for us to go check out the factory and their camper model. The original Kerens Casita production line was modest.
We liked the Casita 16’ Liberty model, but we decided to research Casita and fiberglass campers in general before committing. There was no commercial Internet, websites or Google back then, so it took some time for us to do the old fashioned research to establish that the company was reputable and that their fiberglass shell trailers were safe and serviceable.
Tuesday, December 25, 2018
Wednesday, December 12, 2018
About Molded-Fiberglass Camper Travel Trailers
Fiberglass camper trailers first became popular in counties around the world in the 1960s. Since then several dozen companies and manufacturers of fiberglass trailers have been developed in North America alone. Molded-fiberglass trailers, featuring rounded corners and shiny sides, are aerodynamic, lightweight and built to last.
A molded-fiberglass travel trailer is not just an RV. It represents a lifestyle. Those who dive into researching fiberglass camper trailer RVs will quickly discover that this niche is markedly different than the rest of travel trailer culture.
A molded-fiberglass travel trailer is not just an RV. It represents a lifestyle. Those who dive into researching fiberglass camper trailer RVs will quickly discover that this niche is markedly different than the rest of travel trailer culture.
Saturday, December 1, 2018
Brief Advice for Those New to the Casita Life
If you’ve never camped before - even a single night - in a RV travel trailer camper or motor home, and you’re waiting to pick up your new Casita at the factory, you may have many questions swirling in your mind as you contemplate the camping experiences awaiting you.
Foremost in your thoughts, no doubt, are questions about the essential items you’ll need for your first nights camping after you pick up your new Casita. The Casita factory includes a Water Hose and Water Pressure Regulator as standard equipment with standard and deluxe models, plus a Sewer Dump Hose with deluxe models. The propane tanks on your new Casita are empty so ask your Casita sales rep at pick up for the closest propane retailers they currently recommend. Plus, there are a few comfort essentials you should consider buying to take with you to pick up your new Casita.
Sunday, November 25, 2018
Plan Your RV Trip
If your camping destination is several states away, you will likely put in some long driving days on the road. While spending hours out on the road is certainly part of the RV experience, you have to be careful that those hours don’t get out of control on any given day. Driving tired under any circumstances is extremely dangerous, and it is even more dangerous when you are piloting a tow vehicle with trailer.
Thursday, November 15, 2018
Backing Your Casita Into A Campsite
 Backing a tow vehicle and trailer into a campsite can sometimes be a stressful experience. However, backing (reversing) a trailer is relatively simple, especially with a little practice and teamwork.
First, Use The Scoop to Line Up With Your Back-In Site — Sean Michael produced a short animation on YouTube to illustrate it.
Thursday, November 1, 2018
How to Keep Your RV Safe From Theft
Camping trailers and RVs can be easy targets for thieves, as they can just drive away with not only with the valuables inside, but your trailer as well. RV crime is increasing and it’s becoming a serious concern for those who travel with their campers and trailers every year. If you are a seasoned RV traveler or are new to the camping lifestyle, keep these tips in mind to keep your camper safe from would-be burglars.
Wednesday, October 10, 2018
Replacing Parallax DC 12V Converter
As many have repeated the same experience before us, we arrived at our destination campground on the first day of our road trip, parked, connected to shore power, and the DC 12V power supply was dead on arrival. Our 12V converter probably died while our Casita was parked in its home berth connected to shore power between road trips, and I didn’t notice it. Fortunately, our solar panels kept the battery charged to serve the onboard 12V system for that road trip. It’s always good to have a secondary backup.
How did I know our converter was dead?
Sunday, September 30, 2018
Replace Your Old Battery Charger With A Smart Charger
The next time you pull your Casita out of storage to pack it for a camping trip you may find a dead battery, if it has been sitting for weeks or months without a maintenance charge - or someone played a dirty trick by flipping on the exterior light switch. (Another good reason to install a battery cutoff switch.)
A 12V battery will naturally discharge itself even when fully disconnected (isolated) sitting in storage. The natural discharge rate is about 1% per day at room temperature, 0.25% per day at 10 °C (50 °F) and 1.5% per day at 30 °C (86 °F). This self discharge percentage is the percentage of the remaining capacity, so a flooded lead acid battery will discharge itself to 50% of its capacity after about 6 months.
A 12V battery will naturally discharge itself even when fully disconnected (isolated) sitting in storage. The natural discharge rate is about 1% per day at room temperature, 0.25% per day at 10 °C (50 °F) and 1.5% per day at 30 °C (86 °F). This self discharge percentage is the percentage of the remaining capacity, so a flooded lead acid battery will discharge itself to 50% of its capacity after about 6 months.
Saturday, September 15, 2018
Repairing Rivets In Your Camper
For those who haven’t yet repaired a broken rivet, here is the general procedure for exterior rivets that hold cabinets to the shell interior. Repairing an exterior rivet is really a two person job. Rivet guns can be purchased on Amazon, or at most Lowe’s or Home Depot stores and rivet parts are available at the Casita factory store:
Casita uses a blind rivet. A blind rivet is a rivet that can be completely installed from one side, unlike machine screws and nuts, which requires access to both sides of the material. Blind rivets are also known as "pop" rivets because POP® is one brand of blind rivets.
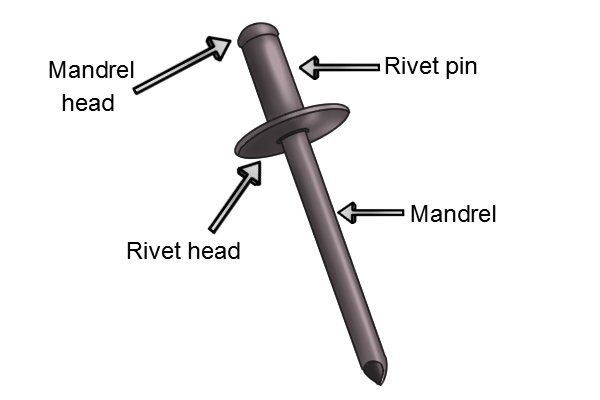
A blind rivet consists of two pieces that are pre-assembled: the rivet body (usually just referred to as the rivet) and inside it is the setting mandrel (commonly just called the mandrel).
Saturday, September 1, 2018
Replacing The City Water Inlet Connection
Replacing the “city water” inlet connection. When I winterized our Casita last December I blew the check valve o-ring on the city water connection inlet. I thought air pressure in the water system - pipes and water heater - was relieved after I finished blowing out the water system, but nope. There was still a little pressure in the system — probably in the water heater that pressurized the pipes when I opened the water heater bypass valve, after closing all the faucet valves. When I depressed the city water check valve stem one last time to make sure the last bit of water was drained, the pressure release unseated the check valve o-ring.
Wednesday, August 15, 2018
Winterizing Your Casita
Whether you park your Casita in your driveway over the winter, or at a commercial storage facility, preventing your rig's pipes from freezing should be a priority, if you want to avoid a hefty repair bill next season.
It’s essential to carry out some precautionary measures before freezing cold weather sets in for winter season. As soon as the air surrounding an unheated Casita’s water system dips below freezing, at 32°F or 0°C, your Casita water system is at risk. Extended exposure to sub-zero temperatures will cause ice to form in the fresh water tank, pump, hot water heater and water pipes, possibly causing the pipes to split.
Wednesday, August 1, 2018
Sanitizing Your Fresh Water Tank and Plumbing System
Many new RV owners do not realize that they need to sanitize their RV’s fresh water tank. This is the only way to ensure that you have safe RV drinking water before you set out on a road trip. If your RV has been in storage for a few weeks or months, you will likely have bacteria in your fresh water system. In order to make the water potable again, you need to sanitize your fresh water tank.
Even if you don’t usually drink water from your fresh water system you need to sanitize your fresh water tank and lines at least twice a year (every six months). You need to do it even more if you use the fresh water tank as a source for potable water. At the very least, you will be using this water for pets, for brushing your teeth and for washing up. Chances are you may use it for coffee and cooking, too, so it’s important not to skip this simple step.
Even if you don’t usually drink water from your fresh water system you need to sanitize your fresh water tank and lines at least twice a year (every six months). You need to do it even more if you use the fresh water tank as a source for potable water. At the very least, you will be using this water for pets, for brushing your teeth and for washing up. Chances are you may use it for coffee and cooking, too, so it’s important not to skip this simple step.
Sunday, July 15, 2018
Dumping and Maintaining Wastewater Tanks
Dumping and maintaining Casita gray and black waste water holding tanks isn’t the most glamorous topic we might discuss, but it certainly is an important topic for most who are new to Casita Life.
Some new to Casita Life decide to order their new Casita as a standard model, sans bathroom, to save on trailer weight, gain extra living and storage space, or because they don’t want to deal with dumping a black water tank. Others elect to order a deluxe model Casita with an onboard bathroom, that provides a marine-style toilet with black water waste holding tank. Having camped with and without an onboard marine toilet over 45 years, Dorrie and I long ago decided an on board toilet is essential equipment. And, its utility has increased as we have become senior campers.
Most RV hard shell campers and even some pop up campers today have marine-style toilets. Marine toilets aren’t like house toilets. Because there’s no toilet water tank, you need to do a two-step flush: Push the handle or pedal halfway down to fill the marine toilet bowl with water, then push it down all the way to flush into the black water holding tank.
Sunday, July 1, 2018
Your Casita Tongue Weight Is Critical To Safe Travel
NHTSA data shows an estimated 50,000 trailer towing related accidents occur each year. Most of these accidents are a result of preventable side to side trailer sway. Crosswinds, drafts from passing semi-trucks or descending hills using incorrect braking technique can initiate trailer sway. In such cases, the rear of the trailer can act as a pendulum that increasingly swings back and forth. As the trailer makes this swaying movement, it can push the tow vehicle into fish-tailing movements. The intensity of the swaying movements can lead to trailer flipping over, which may, in turn, overturn your towing vehicle.
Uneven weight distribution -- too much weight loaded in the rear of the trailer -- is a significant cause of trailer side to side sway increasing to disaster, once it starts. Packing a few tens of pounds to the rear of the trailer can make profound changes in the rig's sway control stability. But properly balanced trailer weight can naturally dampen and stop trailer sway.
But by following a few simple guidelines, you can stay on track, towing with the utmost ease and safety. Swaying trailers are almost always the result of the center of gravity weight not being far enough foreword from the axle, which commonly referred to as insufficient tongue weight. Increasing tongue weight increases stability, but don't add too much weight to your tow vehicle's hitch.
Friday, June 1, 2018
Special Trailer Tires
Casitas with the factory “high rise” option are delivered with either Goodyear Endurance ST205/75R15 load range D tires, or Goodyear Endurance ST225/75R15 load range E tires, depending on supply chain availability. The ST stands for "special trailer" tire. There are differences in the driving requirements between the tires on your trailer and those on the car or light truck you use to tow it. Therefore, there are distinct differences between the way trailer tires and tow vehicle tires are engineered.
Your tow vehicle is a leader, which means traction is a key focus in the design of its tires. Typical passenger and light truck tires are developed with features like flexible sidewalls and long-lasting tread designs. This is because your tires accompany the steering and braking systems on your car and truck and transmit traction power from its drivetrain to the road. Traction allows your tow vehicle to accelerate down the road, turn around the corner and brake to a stop. Another important consideration is tow vehicle tires are designed for ride comfort, which is achieved in part by allowing their sidewalls to flex.
Your trailer is a follower, which often makes tire sidewall flexing a negative. Sidewall flexing on trailers, especially high center of gravity RVs that carry heavy loads, is a primary cause of trailer sway. Typical passenger tires with flexible sidewalls can accentuate trailer sway problems.
Trailers will be more stable and pull better on tires designed specifically for trailer use. Since Special Trailer (ST) tires are constructed with heavier duty materials, they are tougher than typical passenger vehicle tires.
Tuesday, May 15, 2018
What Size Tow Vehicle Do I Need?
One of the first questions asked by people contemplating the purchase of any RV camper trailer is: What size tow vehicle do I need?
How big and powerful a tow vehicle you need depends on the “fully packed for travel” weight of your Casita model of choice, and where you plan to travel with it. Travel only on level to moderate terrain roads verses frequent travel on winding mountain terrain roads, particularly with grades over 3-4 percent and high altitude passes, place different demands on tow vehicles.
First and foremost, for safety, it is important that your Casita trailer weight when fully loaded for travel does not exceed any of the maximum trailer towing ratings specified for your vehicle. A safe trailer load is around 80 percent of the tow vehicle’s maximum ratings.
Vehicle manufacturers specify trailer towing ratings based on a vehicle’s body strength, wheel base length, weight, engine horse power and torque, transmission and rear differential gearing, braking system, and suspension system. If your tow rig is within 20 percent of exceeding any of the vehicle’s maximum weight ratings, it may be difficult to handle at highway speed, stress your tow vehicle’s engine, transmission, brakes or other systems beyond their engineered limits, or lead to a catastrophic accident.
Depending on whether your Casita of choice is a lighter weight 16 foot standard model with no feature options, a 17 foot Deluxe model loaded with every available factory option, or something in between, your fully loaded Casita weight will most typically fall within a range of about 2,500 to 3,500 pounds. But that 1,000 pound difference can make a big difference in your choice of tow vehicles.
Tuesday, May 1, 2018
How to Lubricate Dexter EZ Lube Axle Bearings
The video below shows you how to lubricate the Dexter E-Z Lube® Axle Bearing System on your Casita.
The E-Z Lube® system consists of axle spindles that have been specially drilled and assembled with grease zerk fittings.
 No disassembly is required to repack bearings with fresh grease — just attach a grease gun at the spindle end zerk and inject the grease. When grease is pumped into the fittings, it is channeled to the inner bearing, then to the outer bearing, and eventually back out the grease cap hole for a complete bearing repack.
 No disassembly is required to repack bearings with fresh grease — just attach a grease gun at the spindle end zerk and inject the grease. When grease is pumped into the fittings, it is channeled to the inner bearing, then to the outer bearing, and eventually back out the grease cap hole for a complete bearing repack.
Tuesday, April 17, 2018
Building a Parking Pad and Driveway for My Casita
April 17, 2020
This time one year ago, in April 2019, our Casita became our temporary full time home while we moved our household from the Dallas, Texas, metro area to our new home in Colorado’s grand valley, where the Colorado and Gunnison rivers join on the western slope.

My first joint new home / Casita project in a month after we moved into our new house was to construct a fenced and gated concrete RV pad next to garage of our new house where our Casita could comfortably berth.
Unfortunately, local building codes did not allow me to replace the deep loose gravel RV drive with a concrete drive from the street up to my new concrete RV pad.


The loose gravel drive, that is on a slight incline, has been a problem every time I back the Casita from the street up onto its concrete pad.
The Casita tires and truck tires sink into the loose gravel up to the rims, and I have to back with the the truck locked into 4WD to force my rig through the considerable resistance of the deep loose gravel.
The gate area target I must back the Casta through has only about 12” of clearance on each side. Backing my rig up with my Casita and tow vehicle tires all plowing through the loose gravel drive incline, making a sharp turn on street pavement that transitions to the loose gravel drive, with the truck locked into 4WD, while navigating a blind 12” side to side clearance, with my gate target out of view in the rear mirrors, is a bit of challenge even for me.
By mid-March of a normal year, I’d be de-winterizing the Casita and getting it ready for camping season travel, but spring 2020, unfortunately, isn’t a normal year with so many camping areas around the U.S. indefinitely closed.
Since we are staying at home for a while, I decided to celebrate our first new home anniversary with another joint home / Casita project to fix my loose gravel RV drive problem.


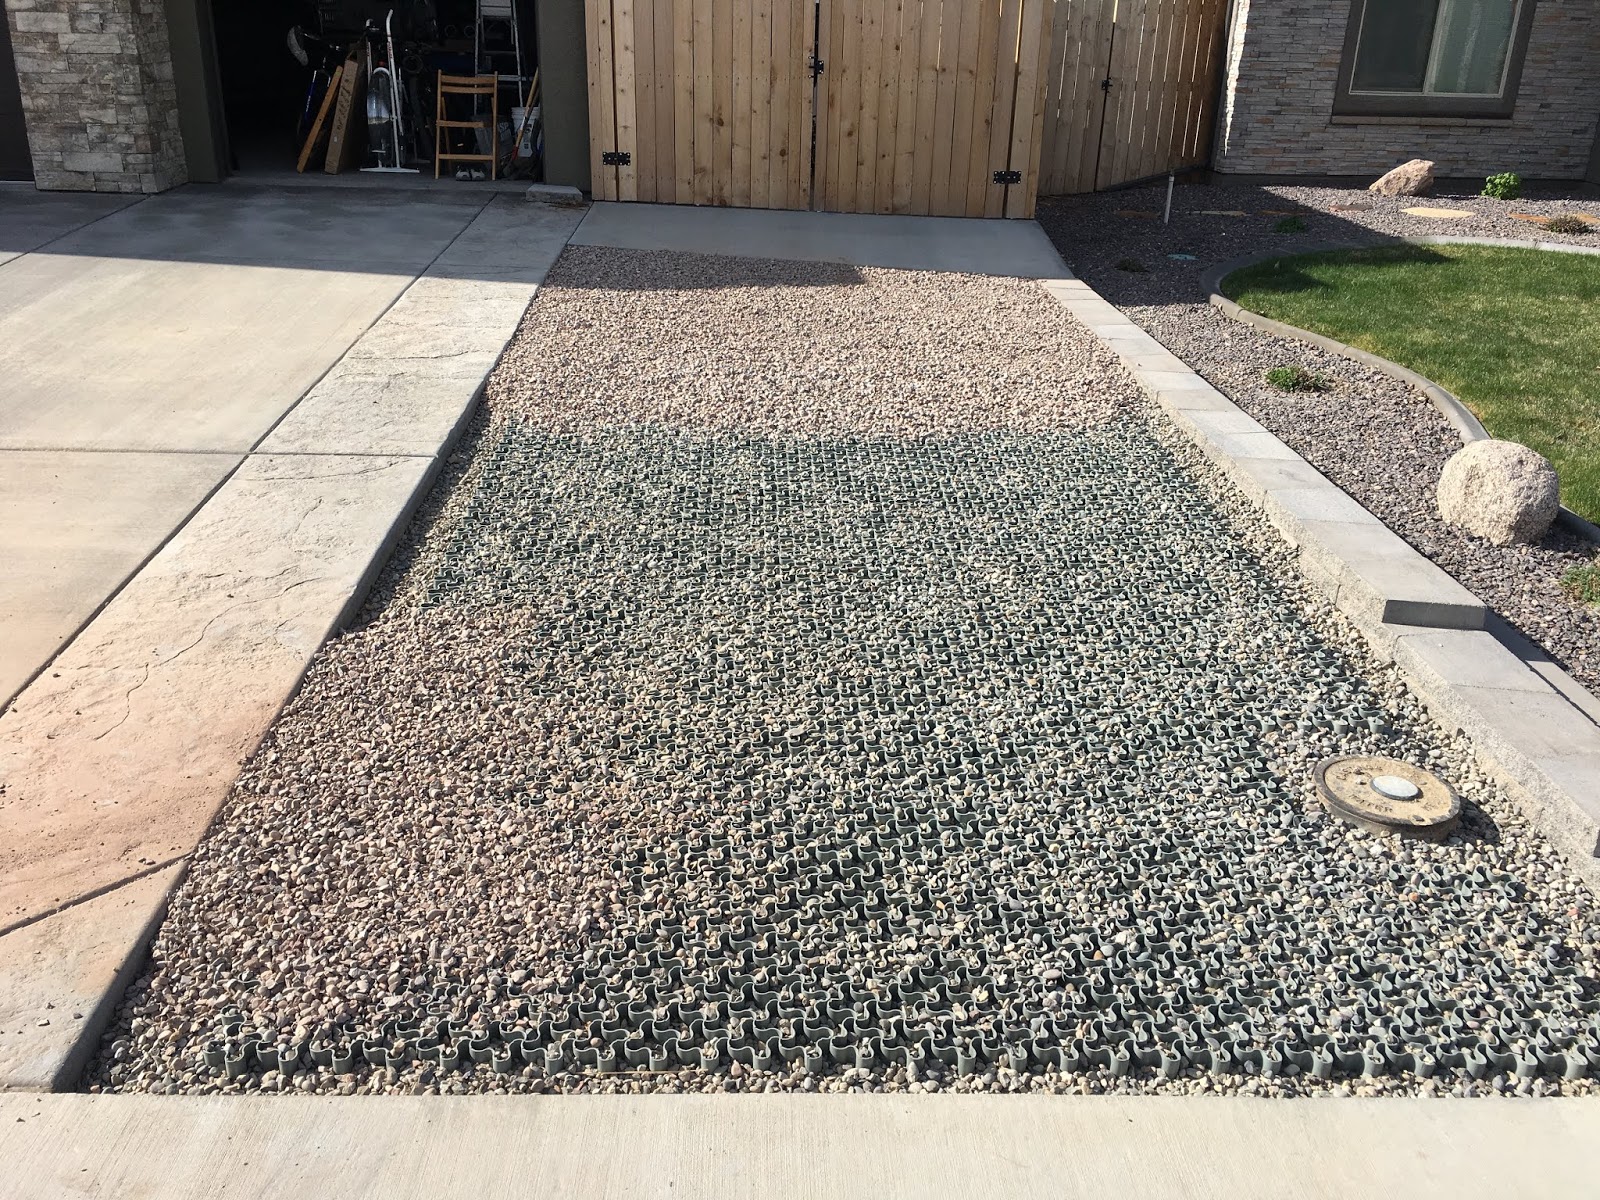
I started a project to install a Standartpark durable plastic EasyPave gravel paving grid panel system on the gravel RV drive — see photo. This gravel paving system panels is engineered somewhat on the same principle as the steel panel paving system employed by Army engineers and Seabees (construction battalions) during World War II to rapidly build air station runways on soft terrain.
The photos at right show the RV drive just before I started my EasyPaver project, and the deeply rutted ground I found under the deep gravel. I shoveled the deep bed of loose gravel from the RV driveway into big gravel piles on the main driveway. This cleared the RV drive area of the gravel so I could build up a short retaining wall on one side. I then leveled the underlying dirt, filling in the deep tire ruts that had been hiding under the gravel.
I prepared an even ground base then shoveled most of the piles of gravel I had shoveled onto the main driveway back onto RV drive space to make an even gravel base of proper depth for the interconnecting EasyPave grid system panels. I used a gas engine compactor to compact the gravel base tight and flat.
Next, I laid out and snapped together the EasyPave 16”X24” panels 7 across and 12 down in the RV driveway space, which is 123” across and 183” down. That left a 6” margin down each side and a 1” margin at the top and bottom of the driveway.
Once the grid panels were in place on the gravel base, I shovel the remaining gravel into the panel grid cells and top dressed the grid with a 1” (approximately) dressing of gravel. The gravel filled paving grid with a thin top dressing of gravel is not visible and provides a solid surface as good as a concrete drive.
The photos below show the compacted gravel base prepared for the EasyPave grid to be laid out.


Next, below, all the EasyPave grid panels are snapped together and starting to be filled with 3/4 gravel.


Finally, below, is the finished drive after the EasyPaver grid has been filled and top dressed with a 1” layer of 3/4 gravel.


This time one year ago, in April 2019, our Casita became our temporary full time home while we moved our household from the Dallas, Texas, metro area to our new home in Colorado’s grand valley, where the Colorado and Gunnison rivers join on the western slope.

My first joint new home / Casita project in a month after we moved into our new house was to construct a fenced and gated concrete RV pad next to garage of our new house where our Casita could comfortably berth.
Unfortunately, local building codes did not allow me to replace the deep loose gravel RV drive with a concrete drive from the street up to my new concrete RV pad.


The loose gravel drive, that is on a slight incline, has been a problem every time I back the Casita from the street up onto its concrete pad.
The Casita tires and truck tires sink into the loose gravel up to the rims, and I have to back with the the truck locked into 4WD to force my rig through the considerable resistance of the deep loose gravel.
The gate area target I must back the Casta through has only about 12” of clearance on each side. Backing my rig up with my Casita and tow vehicle tires all plowing through the loose gravel drive incline, making a sharp turn on street pavement that transitions to the loose gravel drive, with the truck locked into 4WD, while navigating a blind 12” side to side clearance, with my gate target out of view in the rear mirrors, is a bit of challenge even for me.
By mid-March of a normal year, I’d be de-winterizing the Casita and getting it ready for camping season travel, but spring 2020, unfortunately, isn’t a normal year with so many camping areas around the U.S. indefinitely closed.
Since we are staying at home for a while, I decided to celebrate our first new home anniversary with another joint home / Casita project to fix my loose gravel RV drive problem.


I started a project to install a Standartpark durable plastic EasyPave gravel paving grid panel system on the gravel RV drive — see photo. This gravel paving system panels is engineered somewhat on the same principle as the steel panel paving system employed by Army engineers and Seabees (construction battalions) during World War II to rapidly build air station runways on soft terrain.
The photos at right show the RV drive just before I started my EasyPaver project, and the deeply rutted ground I found under the deep gravel. I shoveled the deep bed of loose gravel from the RV driveway into big gravel piles on the main driveway. This cleared the RV drive area of the gravel so I could build up a short retaining wall on one side. I then leveled the underlying dirt, filling in the deep tire ruts that had been hiding under the gravel.
I prepared an even ground base then shoveled most of the piles of gravel I had shoveled onto the main driveway back onto RV drive space to make an even gravel base of proper depth for the interconnecting EasyPave grid system panels. I used a gas engine compactor to compact the gravel base tight and flat.
Next, I laid out and snapped together the EasyPave 16”X24” panels 7 across and 12 down in the RV driveway space, which is 123” across and 183” down. That left a 6” margin down each side and a 1” margin at the top and bottom of the driveway.
Once the grid panels were in place on the gravel base, I shovel the remaining gravel into the panel grid cells and top dressed the grid with a 1” (approximately) dressing of gravel. The gravel filled paving grid with a thin top dressing of gravel is not visible and provides a solid surface as good as a concrete drive.
The photos below show the compacted gravel base prepared for the EasyPave grid to be laid out.


Next, below, all the EasyPave grid panels are snapped together and starting to be filled with 3/4 gravel.


Finally, below, is the finished drive after the EasyPaver grid has been filled and top dressed with a 1” layer of 3/4 gravel.


Tuesday, January 30, 2018
Refrigerator Hinge Repair
The Dometic fridge in the 17′ Casita has a weak plastic hinge. It can break if it pops open in transit, is overloaded, or by leaning on it while open. Replacing the hinge required a costly new door from Dometic until Little House Customs came to the rescue with a stainless steel reinforcement plate that will help prevent the hinge from breaking. It will also fix a broken hinge. Click here to read full DIY refrigerator hinge reinforcement instructions.
Subscribe to:
Posts (Atom)
-
 Back in the 1980’s, Dorrie and I were traveling and camping in our Dodge Maxi Van camper. We ordered the van - with a two barrel carburetor ...
 -
 NHTSA data shows an estimated 50,000 trailer towing related accidents occur each year. Most of these accidents are a result of preventable s...
 -
 Casitas with the factory “high rise” option are delivered with either Goodyear Endurance ST205/75R15 load range D tires, or Goodyear Enduran...