For those who haven’t yet repaired a broken rivet, here is the general procedure for exterior rivets that hold cabinets to the shell interior. Repairing an exterior rivet is really a two person job. Rivet guns can be purchased on Amazon, or at most Lowe’s or Home Depot stores and rivet parts are available at the Casita factory store:
Casita uses a blind rivet. A blind rivet is a rivet that can be completely installed from one side, unlike machine screws and nuts, which requires access to both sides of the material. Blind rivets are also known as "pop" rivets because POP® is one brand of blind rivets.
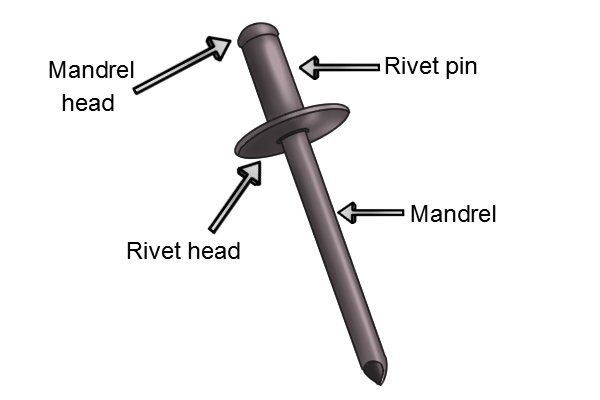
A blind rivet consists of two pieces that are pre-assembled: the rivet body (usually just referred to as the rivet) and inside it is the setting mandrel (commonly just called the mandrel).

Installation of blind rivets is easy: (1) insert the rivet into a hole that passes through the items to be joined; (2) insert the mandrel into the special installation tool; (3) "set" the rivet by pulling on the mandrel, which creates a bulge that permanently and securely fastens the items. At a predetermined point, the exposed mandrel will break off inside the rivet.
Blind rivets are available in different head styles like dome, large flange, and countersunk, and in different combinations of materials, which affects strength and corrosion resistance…
- Aluminum Rivet & Aluminum Mandrel
- Aluminum Rivet & Steel Mandrel
- Steel Rivet & Steel Mandrel
- Stainless Steel Rivet & Steel Mandrel
- Stainless Steel Rivet & Stainless Steel Mandrel
Casita, as do most camper manufacturers, use (aluminum) blind rivets because they install quickly and easily; they produce strong reliable fastenings (if the mandrel breaks off, the rivet is installed correctly); they are vibration and tamper resistant; and the rivets and installation tool do not mar the surfaces of the material being joined.
Most blind rivets are open end, which means that the rivet pin body is completely hollow.
Procedure
- Remove the old rivet from the hole. Use the old rivet to select the appropriate replacement rivet diameter and length size. If the rivet is just loose and not completely broken off, you need to drill the rivet pin head lip (under the exterior white rivet cap) to remove the rivet. Casitas across the model years have 1/8", 5/32", and 3/16" rivet pin diameters depending on the rivet location. Use a drill bit no more than 1/64" over the rivet pin size. For most rivets, use a 1/8" or 3/16” drill bit is to drill the lip of the rivet. Drill with very light pressure just deep enough for the head lip of rivet around the pin to pop off - takes about 5 seconds or less with a sharp bit.) ;
- Put a dab of silicone caulk around the exterior rivet hole through the shell - not too much ;
- Place the clear nylon snap retainer on the new rivet pin;
- Insert the rivet pin into the hole. You should have just just enough of a dab of caulk to seal the nylon snap to the shell exterior;
- Helper person on the inside puts a acorn nut on the rivet shank sticking through the hole and holds it firmly in place, while pressing the cabinet to be riveted firmly to the shell wall. The easy way to do this is to put the nut in a shallow socket on a short extension on a ratchet wrench. This makes it easy to firmly hold and put pressure on the nut. An alternative method to press the cabinet lip to the shell wall is to wedge a board that extends to the floor under the cabinet lip;
- Put the pop rivet gun over the mandrel stem on the outside and squeeze the handles until the rivet pops. The mandrel pulls the rivet pin shank up to expand a bulge inside the threaded acorn nut to hold fast on the acorn nut by the time the mandrel pops - that is, breaks below the pin head lip. As you compress the rivet shank with the gun the rivet length with shorten a bit as it expands inside the nut and bites into the nut threads;
- Place the white snap cap over the nylon snap retainer and snap it in place.
Typically, interior fixtures and devices — brackets, hooks, thermostat, smoke detector, propane detector, etc. — use 1/8″ aluminum rivets. Rivets that attach cabinets to the exterior shell are 3/16″ in various lengths, depending on location. High strength applications such as for awning brackets, appliances, etc. use “exploder” tri-fold pop rivets. The Little House of Customs sells a little rivet kit that covers everything in a Casita. Rivets can also be ordered from the Casita factory store.For the upper cabinets, the rivet must be just long enough to go through the exterior roof shell, carpet covering the shell interior, fiberglass cabinet lip, and into the acorn nut. The rivet must be long enough to insert all the way, or almost all the way, into the a acorn nut without hitting the bottom of the nut, while the nut is held tightly against cabinet lip as the cabinet is pushed snuggly against the carpet. The rivet and nut must firmly hold the cabinet (must not wiggle in the slightest) when the rivet is set. Take time to select the correct length rivet. Some prefer to replace broken rivets with #10 stainless steel machine screws and an acorn nut.
Below are some photos of my repair on the acorn nut that slipped off its rivet on an upper cabinet. I braced a 6’ pine board under the cabinet lip to press it firmly to the shell wall so Dorrie only had to hold the acorn nut on the rivet end on the inside as I used the rivet gun on the outside to set the rivet inside the nut.
If a rivet is loose, but not broken, you probably need to drill out the rivet to remove it. I use a 3/16” drill bit for exterior size rivets. Drill the pin head (lip) end of the rivet from the outside. Drill with very light pressure just deep enough for the lip of rivet around the stem to pop off - takes about 5 seconds or less with a sharp bit.
Alternative to rivets: Some have replaced broken rivets I #10-24 flat head machine screws that screw into the 1/4” acorn nut.


After reading your article I was amazed. I know that you explain it very well. And I hope that other readers will also experience how I feel after reading your article. valutazione camper rimor
ReplyDeleteSuper clean, no residue left. Auto Body Shops OKC
ReplyDelete